 Pin
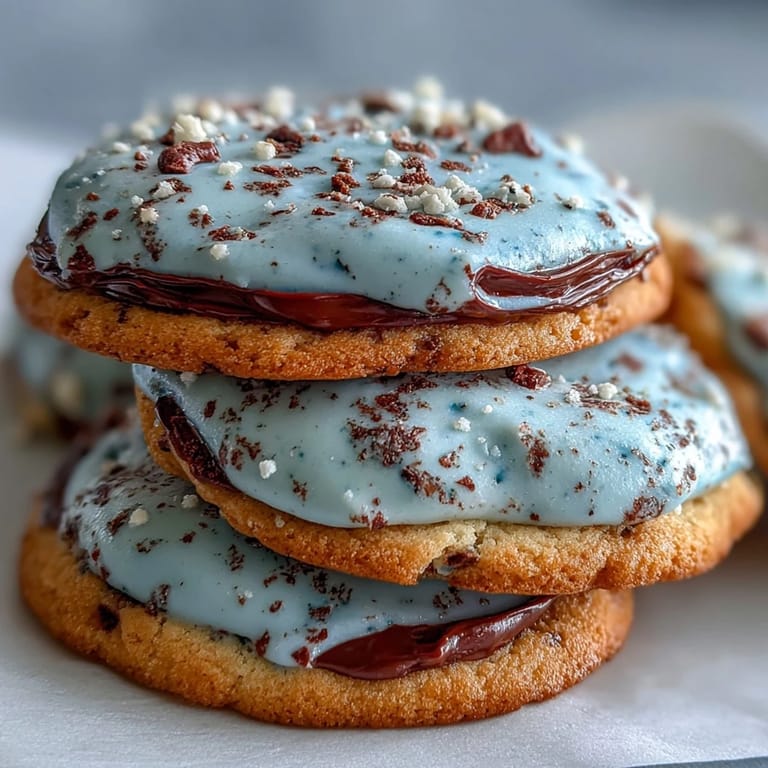
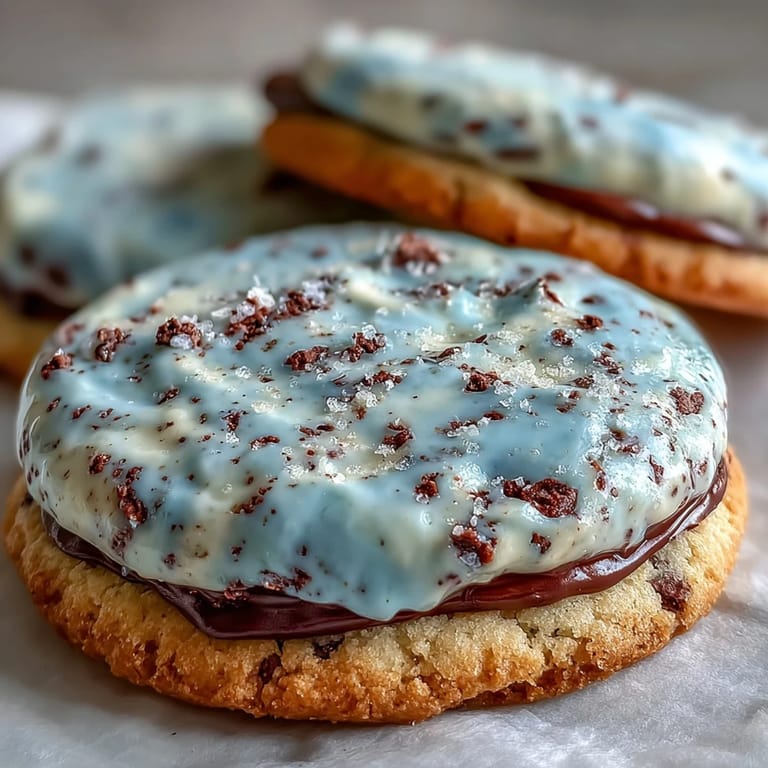
Pin The first time I made these Spring Cookies, the air outside was crisp and carried that telltale sweetness of new blooms. I remember being drawn in by the idea of tiny robin's eggs, their delicate color promising the start of sunnier afternoons. As I worked the dough, blue streaks formed like watercolor, and it struck me how playful food can be. Baking them became much more than just a treat—I found myself grinning at every speckle, wondering if the birds outside would approve. The process felt joyful, as if spring itself had stepped into my kitchen.
I once brought a batch to a rainy afternoon tea with neighbors, and laughter filled the room as we debated whose speckles looked most like real eggs. There was a moment when someone dropped a cookie, and instead of disappointment, it became a minor masterpiece—everybody wanted the 'cracked robin's egg.' Since then, these cookies remind me how shared food often brings unexpected joy.
Ingredients
- All-purpose flour: Gives structure to the cookie and keeps them tender; measure carefully to avoid tough treats.
- Baking powder: Adds just enough lift; sifting together ensures even distribution.
- Fine salt: Balances sweetness and accentuates the buttery flavor.
- Unsalted butter: Softening beforehand lets it cream smoothly with sugar for a delicate crumb.
- Granulated sugar: Brings crisp edges and classic sweetness; resist substituting with other sugars.
- Large egg: Binds dough; room temperature eggs mix more evenly.
- Pure vanilla extract: Rounds out flavor—you'll notice its warmth in every bite.
- Almond extract (optional): Adds a gentle, floral note; use sparingly as it can overpower.
- Blue gel food coloring: For the robin's egg look; a little goes a long way, and gels won't dilute dough or icing.
- Powdered sugar: Sift very well for soft, lump-free royal icing.
- Milk: Adjusts icing consistency; start with less and add as needed.
- Light corn syrup: Helps icing set glossy and smooth.
- Vanilla extract (for icing): Enhances sweetness and aroma in the icing.
- Cocoa powder: The secret to realistic speckles—unsweetened is best for deep color.
- Water: Thins cocoa for splattering; add drop by drop for controlled speckles.
Tired of Takeout? 🥡
Get 10 meals you can make faster than delivery arrives. Seriously.
One email. No spam. Unsubscribe anytime.
Instructions
- Mix Dry Ingredients:
- Combine the flour, baking powder, and salt in a medium bowl, whisking to blend and aerate. The smell reminds me of fresh linen each time.
- Cream Butter and Sugar:
- Beat butter and sugar until light, pale, and fluffy—when the mixture looks almost like whipped cream, it's ready. Listen for the mixer hum mellowing as air gets incorporated.
- Add Egg and Extracts:
- Mix in the egg, vanilla, and almond extract; the dough loosens and the vanilla aroma fills the air. If you’re using almond extract, it will sneak up unexpectedly, hinting at spring blossoms.
- Bring It All Together:
- Gradually fold in the dry mixture—stop as soon as no flour streaks remain. Overmixing here can spoil the delicate texture.
- Color the Dough:
- Add a couple drops of blue food gel and gently knead until you reach a robin’s egg shade. Try not to overwork—the color develops as you fold.
- Chill the Dough:
- Split dough into two, shape into discs, and wrap well. Chilling lets the butter firm up—if you skip, the edges blur while baking.
- Prep and Roll:
- Heat oven to 350°F and line sheets with parchment. Flour your surface so dough doesn’t stick; rolling feels satisfying when you see that pale blue stretch.
- Shape:
- Use oval or egg cutters to press shapes; gently transfer onto sheets spaced apart. I always lose one cookie to sticky fingers, so keep a thin spatula handy.
- Bake:
- Bake 9–11 minutes. The edges should look set but not golden—watch closely as the line between perfect and overdone comes quick.
- Cool:
- Let cookies rest on the tray for a few minutes before moving to a rack. The cooling aroma is soft and buttery, a tempting preview.
- Make Royal Icing:
- Whisk sugar, milk, corn syrup, and vanilla in a bowl until silky. Add blue gel bit by bit and blend until the shade just feels like spring.
- Decorate:
- Spread or pipe blue icing over cooled cookies; let set for 15 minutes. This part always makes me pause to admire their shine.
- Speckle:
- Mix cocoa, water, and vanilla; dip a stiff brush and gently flick speckles onto each cookie. Protect your work area—speckling is messy but fun.
- Finish and Dry:
- Let icing dry completely before storing or serving. As they set, the cookies firm just enough for that first crisp bite.
 Pin
Pin I still remember the time my niece insisted on speckling every cookie herself, leaving chocolate smudges on both her face and the kitchen table. Seeing the delight on her face turned a simple baking session into a memory I now repeat every spring. It became our tiny tradition—making robin's eggs and telling silly bird stories.
Making Your Cookies Extra Special
Experimenting with shapes is half the fun—sometimes we use round cutters when egg-shaped ones go missing. I find that the cookies are always just as magical when there's a variety on the plate, even if their outlines aren't perfect. Sprinkling a tiny bit of coarse sugar before baking adds a subtle sparkle. Decorating is best when music is playing and sprinkles threaten to bounce in every direction. These moments make the cookies feel more personal.
Perfecting the Royal Icing
Thin icing spreads smoothly and dries glossy, so add milk incrementally and pause before adding more. On chilly days, icing dries slower—sometimes I nudge cookies closer to a sunny window to speed things along. Sifting powdered sugar carefully is key for velvety results. If you're nervous about piping, an offset spatula works just as well and less fuss. Taste-testing leftover icing is almost inevitable—just don't eat it all!
Mess-Free Speckling and Storage
Speckling can get out of hand, so covering your workspace and wearing an apron saves on cleaning time. I’ve learned that flicking softly gives the prettiest effect; too much force and you end up in abstract art territory. Once the icing is dry, layer cookies between parchment in an airtight container so the speckles stay crisp and vivid.
- Start speckling one cookie at a time to test your flicking technique.
- Let cookies dry completely before stacking for transport.
- Keep them sealed up, and they’ll stay fresh all week long.
 Pin
Pin May these cookies brighten your spring days as much as they've delighted mine. Get creative with the colors—and remember, even the messiest ones will draw smiles.
Recipe Q&A
- → How do I achieve the pale blue color?
Use blue gel food coloring in small amounts to tint both dough and icing, adding gradually until you reach the desired shade.
- → What's the best method for speckling cookies?
Mix cocoa powder with water and vanilla, then flick a food-safe brush or toothbrush lightly over the iced cookies to create speckles.
- → Can almond extract be omitted?
Yes, almond extract is optional. It adds a subtle flavor but the cookies taste delicious without it.
- → How do I prevent cookies from spreading?
Chill the dough thoroughly before rolling and cutting shapes. This keeps edges sharp and avoids excessive spreading during baking.
- → How should I store these cookies?
Store in an airtight container at room temperature for up to one week to maintain freshness and texture.
- → What shapes are best for spring cookies?
Egg or oval shapes are ideal for a spring motif, but round cutters also work well for these cookies.